Today I am back at
Crafting Con! Season four began in April, and they have been hosting a new theme for friendly competition and tutorials each month throughout the spring and summer. I
competed there back in May, which was Star Wars month. This season is culminating this month with a twist: the usual idea is that all clothes made for each theme must be
inspired by the theme and sewn up in everyday clothes; in October, in honor of Halloween, it will be all full-on costumes all the time! Hurray! Also, there is no competition this month, and all the voting for each previous month of the season will be happening during this final month. So be sure to keep an eye on
Crafting Con for some awesome costume inspiration and the results of all the fantastic sewing that went on this year.
So, as we find ourselves on the opening day of October, it's all about costumes. My blog was pretty sparse last year, and I never even posted the girls Halloween costumes! Which is ironic, because they may have been the best costumes I've created to date. (although I
was pretty fond of
Robin Hood and Maid Marion the year before). Sometimes it seems that all the sewing and the life-living just gets in the way of computer time. We sure had fun with those costumes though!
They were Fawn
and the Neverbeast,
and they were each so excited to play their role.
Althea was Gruff (the Neverbeast) of course. She still to this day loves animal role play above all other games (panda, cheetah, wolf, ewok, Neverbeast, joey, cat, monkey-you name it). This has been going on for years, and it's amazing to watch. Her feline and canine personas even have names (Nora and Stella, respectively). She loved all the versions of Gruff in the movie, although she did need some reassuring when things started to get intense towards the end and Gruff transforms to his super hero self.

She knew that she wanted to be Gruff as soon as she saw him. And I was pretty into the challenge of recreating that awesome character for her. Finding the fur was the first obstacle. He looks pretty grey to me. I couldn't find any grey fur however, so I decided to see if I could create some by dyeing white fake fur. The catch is, that most dyes are aimed at natural fabrics, which this certainly is not. I read some tutorials and cosplay discussion boards and found
this tutorial the most helpful. I decided that since I wanted to achieve a pastel color, I would probably be okay. They make a special kind of dye for synthetic fabric, so I bought the black RIT for polyester and went to work. Unfortunately, there were some unexpected undertones to the dye and when I took my fur out of the dye bath, it was a very dark green color. Yikes! I began washing it out in hot water as much as I could and it finally dulled down to this more subtle greyish blue.
The moral of this story I believe, is that simpler is probably better sometimes. We could have certainly pulled off a white Gruff especially since I also painted black stripes and swirls onto the costume with black fabric paint once it was all sewn up. (That was another adventure; I ended up hanging the costume from the ceiling to paint it, so that I could do it all in one shot instead of flipping it over and letting it dry between sides.) But if I hadn't done it, I would have wished that I had, not knowing what the end result would have been.
I wanted to make her at least one piece that would be wearable outside of the costume setting and debated doing a hoodie with pants for the final look, but ended up with a fur suit and a hat. So she is able to wear the hat on its own throughout the cold weather.
I used the hood from the same pattern in
Ottobre 06/2013 that I used for
Althea's popsicle coat to make the hat. I added two snaps to the chin strap to keep it closed (velcro would have been too rough on her chin; I abhor buttonholes, so snaps it was. They worked well. It actually stays snapped most of the time and she just slides it on that way, so perhaps I could have avoided closures altogether). The ears are fur with some fleece for the inner ear. They each have a pipe cleaner stuffed inside to give them a little bit of shape and are hand sewn onto the hat. The horns came out great. They are made of two pieces of fleece each and are stuffed with fleece scraps. The key though, is that they are hand sewn on and so have a wide round base that is attached to the hat. I have made
a few unicorn hats in the past and attached the horn by sandwiching it into the midline of the hat and no matter how much you tack the seam allowance down and stuff the horn, there is just no way that it will ever stand up properly. They need to be hand sewn with a round base. Totally worth the time, and with fabric like this, you can't see the stitches no matter how sloppy they are!
The last thing I would like to point out on the hat, are the teeth. I thought I was done with that at one point, and was asking Althea how she liked it, and she told me "Good, Mommy, just needs teeth". This had not even been on my radar at all, but as soon as she said it I realized it was the perfect detail. So I added the teeth along with a black "lower lip" around them to finish it off.
I ended up drafting the rest of the fur suit myself, and I have since decided to use patterns as often as possible. Saving a few bucks is not worth the aggravation. I ended up having to add in a big crotch gusset, which would have been much easier to do
before I sewed the whole thing together.
It worked out in the end though, and really only cost me some extra time. Both the body and the hat are lined with an old soft bed sheet so that it isn't itchy at all. This also gives a little extra warmth. I added flaps to cover her shoes and mitts that can go over her hands (the mitts can also be slipped off to leave the hands free). There is a zipper for entry, and several hidden pockets to stash battery packs.
Battery packs you say? What do you need battery packs for? Well no Gruff costume would be complete without taking into account his superhero self. I thought I was going to use green Christmas lights, but a friend of mine clued me in about electroluminescent aka EL wire and I bought some off Amazon for amazingly cheap. It was perfect!!! They had so many colors to choose from and came in four foot strands that run off a small battery pack with two double A's. The battery packs had little clips on the back, but they all broke off (I seriously paid about $4 for each package though, so I wasn't expecting much; and to their credit the fur was too thick for the plastic clips). This was no biggie though; I had plenty of extra fur, so I sewed on some patch pockets in key locations and we just tucked those battery packs in and hid them. Also, the battery packs are detachable from the line of wire and so I can remove them completely to store the costume. I hand sewed the wire to the costume - green all along the black stripes and orange outlining the wings. I have a better picture over at Crafting Con, but here is a blurry shot that gives an idea of how bright she was:

Light up Halloween costumes are the best! We are always trying to make them visible and therefore safe when they run around at night. Dave has had the genius idea of dropping a headlamp or lit flashlight or powerful glow stick into their candy-holding plastic pumpkins, but Gruff could be seen down the entire street. She was pretty easy to find in a crowd as well!
Althea was so happy with her costume, and I was so happy watching her play in it. The way that Halloween sparks the imagination is one of the most magical parts about it.
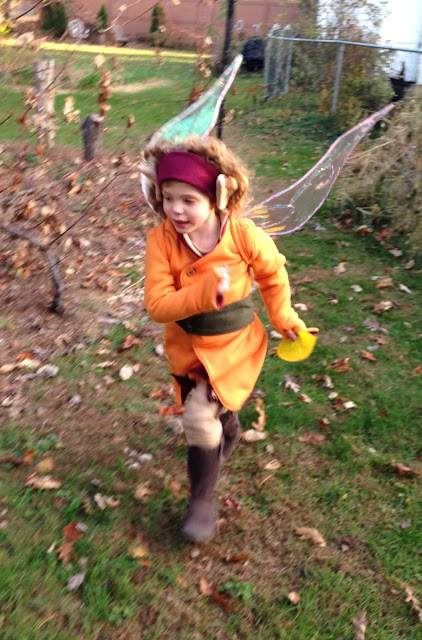
Her sister was just as excited for her costume! Fern was Fawn, Gruff's closest fairy friend. We started by recreating the dress Fawn wears in the Neverbeast movie. The one shoulder look is a little beyond her years though, and she has agreed to wear the tan long sleeve shirt I made to go with it whenever she wears it out of the house. The shirt was made from that same Ottobre magazine (I have gotten some serious miles from this!) and the dress is essentially self drafted but the bodice began with the same pattern as the shirt.
Halloween is a chilly time of year in New England (usually) though, so we couldn't stop there. I went back to the Ottobre mag for a pants pattern, and made her some tan fleece leggings. Having tan, close-enough-to-flesh-tone garments to go underneath all the dress up clothes is great. These two garments will get some use in a variety of situations.
She had the perfect pair of tall brown boots, so I was off the hook for making her a pair (which she totally thought I was capable of; love that girl). But she did need a warm coat that was part of her look as well. So we went back to The Secret of the Wings for some inspiration and tried to mimic the coat Fawn wears when they travel to winter.
This coat was a lot of fun and ended up being the real heart of the costume.
I used the same pattern from that Ottobre (again!) that I used as a base for
Fern's lollipop coat. This coat is not only fully lined with another layer of fleece, but it is fully reversible to increase the options for wearing this after Halloween.
For closures, it has a button near the top and a waist band that is actually two part; half is sewn down to the coat and the other half is loose and tucks through a slit in the side seam to wrap around and secure the coat closed. There are two buttons; one on each side of the coat, and also two sets of snaps on the waistband to complete the reverse-ability.
The coat also has a whimsical collar and a fun hem to match Fawn's coat.
And in order to keep those hands warm, we have thumbholes and a pointed cuff that extends down over the top of her hand in the style of all of your favorite princess gowns.
This coat was so toasty, and she wore it all winter long, unless it was a total snow day.
But to complete the Fawn look, we needed a couple more key items.
How can you be a fairy without wings? There are some incredible cosplayers out there, that are wonderful about sharing tips on creating their favorite looks. I found the flying fox on Deviant Art through pinterest, and completely relied on
her tutorial to make these wings. They are made using Fantasy Film, which was unavailable in the large sheets the last time I checked and was only available in rolls 4"x10'. Hopefully they will restock though, because this stuff is truly magical!
Watching the light catch and shine through them was so captivating.
They ended up being rather fragile and big for her. She kept bumping people with them, and some of her friends poked a hole in part with their fondling and aggressive ogling. But we still have them, and she wore them with pride multiple times throughout that Halloween season.
The final detail was one my of absolute favorites. In order to keep her head warm, I made some pixie ear muffs! These are awesome in their simplicity and ability to be worn to enhance so many different costumes. Or whenever you feel like being an elf!
She kills me in this one!
The ears are so simple. It is a headband made to fit her head, with the ears sewn on. The ears are two layers of fleece sewn together with an left open to turn them right-side out. Once they were turned rightside out and the tip of the ear was pushed all the up, the open inch was sewn shut with seam allowance tucked in. Then, I just sewed the ears to the headband with a spiral shape to give the ears a quilted look that mimics the curvature of the inside of the ear pinna.
They are such a fun accessory, your sister will probably want to borrow them.
She will start with a sneaky photobomb....
get caught in the act....
and end up wearing them all night long. Literally. Sleeping with them on.
But when you have a great costume you might as well get some miles out of it, right?
Happy Halloween!
Thanks for stopping by!


