Thursday, December 4, 2014

Althea's Birthday Nightie (and a lovely gift for me)

A birthday girl in the house!


We have actually had multiple birthdays recently. Fern turned 5 in October and my little baby turned 3 on me in November! Wow. Keep it together Jenn, they are still little and stinking adorable at that. 
Althea was actually born on Thanksgiving Day, and her birthday is the day before mine. Also my husband and my anniversary is in October, Christmas obviously is approaching and my husband's birthday coming up in the first week of January. So we knock out every major holiday / celebration in our house with 3 months. Fun, busy, fun.
Fern received a Frozen nightgown for her birthday from her grandmother and Althea had mentioned that she hoped she was going to get one as well. I checked in with Grandmom though, and found out that was not the case (she was getting some cozy fleecy jams instead- those grams are good at keeping things even!). I had been thinking about doing Christmas Eve nighties for the girls though, and so figured why not get a head start with a birthday nightie. 
I had pinned this dress a while back with the intention of using it for nightgown:
There is a great tutorial that goes along with the post of this dress that was very easy to follow. It is based off the shoulder measurement taken from a dress that currently fits. 
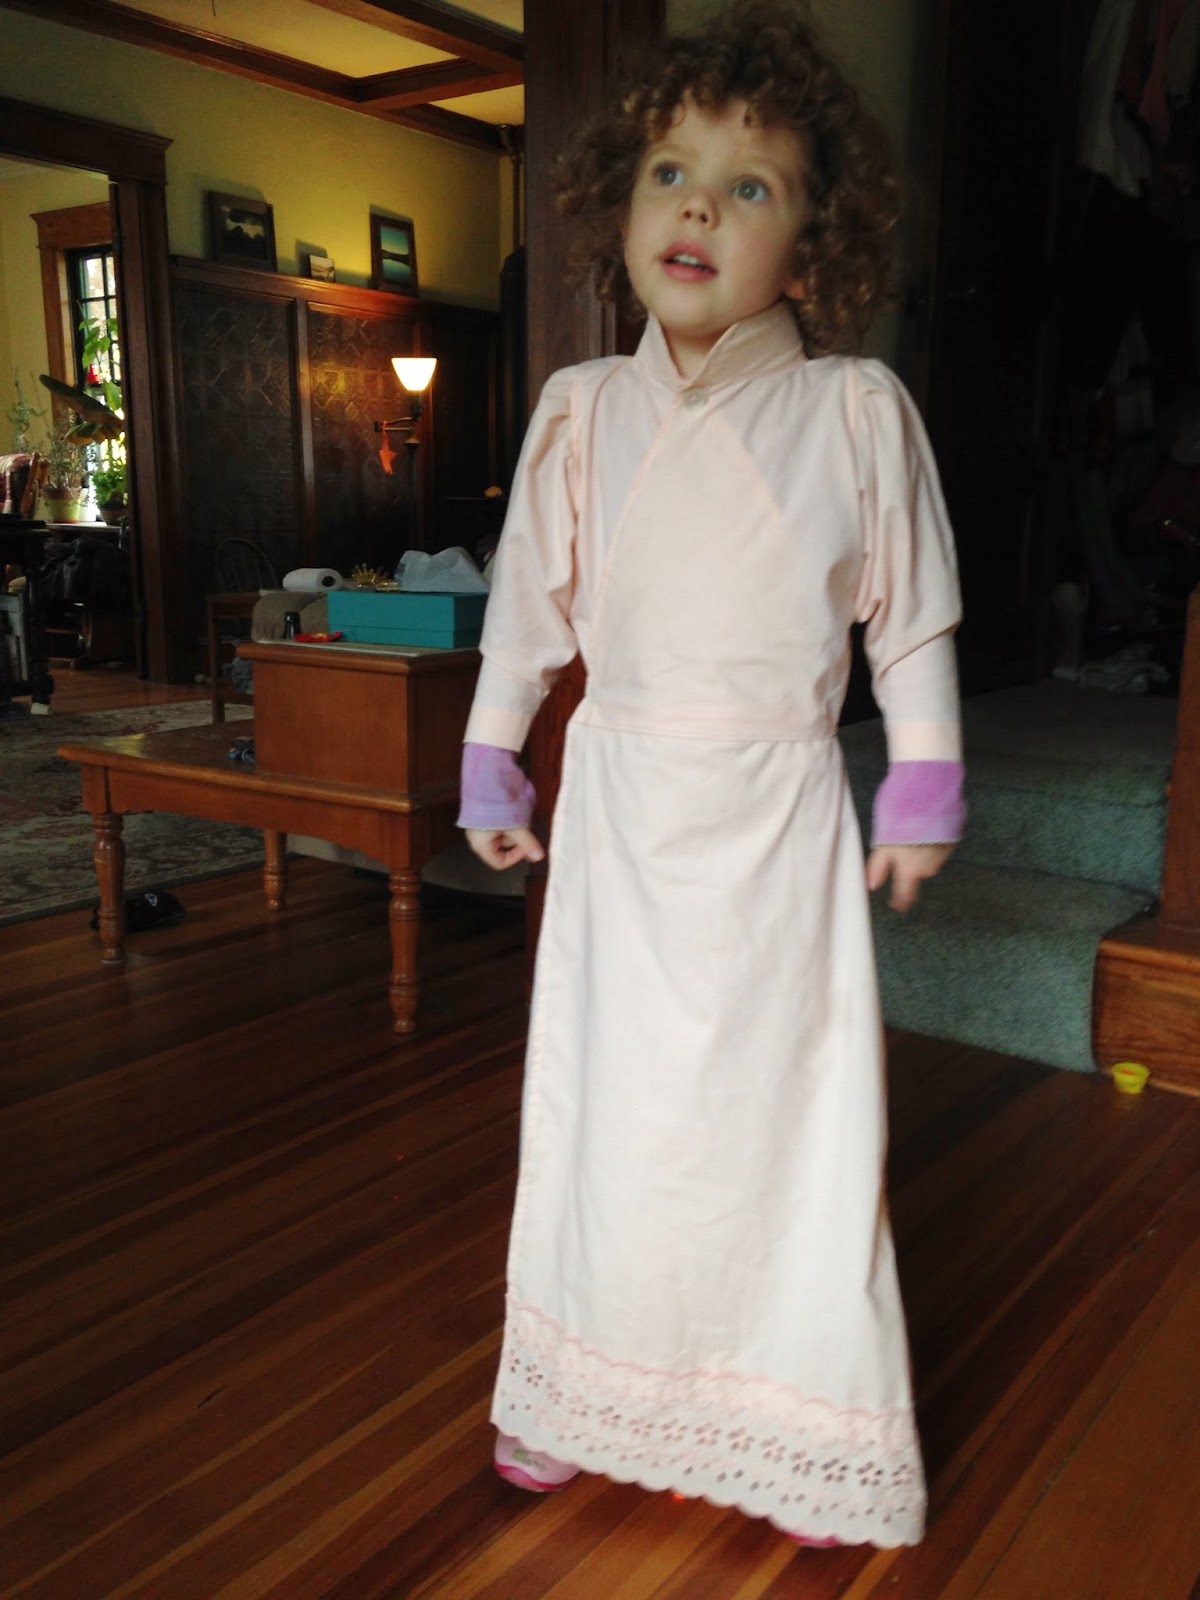
I wanted to make a warm winter nightie though, so I added long sleeves. I also did about 4 rows of shirring a couple inches from the hem of the sleeves to produce a ruffled cuff. I wanted it to be a surprise on her birthday, so I never had her try it on during the sewing process. The end result is a neckline that is a little bit wider than I probably would have left it if I had tried it on her when Amber told me to in the tutorial. I would rather have it be slightly big than to have it be too small to get over her head though, so I'm fine with it. It will fit her for a long time (and the neckline is all handstitched in place!) so it is going to stay that way.

When Althea first opened up the nightie she held it up and said "uh, it's too big," put it down and kept on going with the present opening. Once everything had calmed down a bit though, I explained that it was supposed to be long, she tried it on, and was hooked. She has worn it to bed every day since (except for two days when it was in the wash) and she loves to twirl around and proclaim herself a princess when she wears it. Yes! I just love when they love it.
 The fabric I used for this was given to me by a sweet woman that I have never even met. My husband is the manager of a local shop and was talking to a customer about the fact that I have been sewing, so she brought in a huge box of treasure for him to pass on to me! It was amazing. Look at this stash box:
She gave me all of this stuff! Including the box! There was even some 1/4" elastic in there. This is not just a box of scraps either, I'm talking some serious yardage here. And can you see the little piece of paper clipped to that rose print? A lot of it was labeled with exactly how long each piece was. I see the makings of some sweet Fourth of July outfits and perhaps a mermaid dress of some sorts.  Here is a close up of some of the pretty florals and stripes:


And here is the flannel that screamed nightie at me from the moment I saw it:


So once again, thank you so much Diana! And thank you to my husband for thinking of me at work, and being such a genuinely nice person that people like to do things like this for you.
Here is one more parting shot of my birthday girl seen here taking her chosen birthday balloon aka Rudolph for a walk.


 As I write this, about a week after this picture was taken, she is asleep in her bed, wearing this nightie, with Rudolph sleeping in bed with her. I love the way they latch on to certain things and obsess a bit over them for a while. They take so much pleasure from such simple things.
                           
Happy Holidays!


Sunday, November 2, 2014

It fits!!! The only thing cuter than homemade baby clothes is a baby wearing said clothes. Precious.

Wednesday, October 29, 2014

Halloween 2014!

      Hurray! Halloween is here! My favorite holiday to sew for. I actually finished the costumes a few days before Halloween, and I spent less then $4 on fabric. I'm feeling quite proud!
      Do you remember Disney's Robin Hood? My brother and I adored that movie. We watched it over and over and over and laughed and laughed and loved it. My husband and his brothers all felt the same way. So last fall one day when Fern was sick we picked up that movie on itunes and have begun the indoctrination of our kids on all those old Roger Miller tunes. They love watching the adventures of that crafty fox, Robin Hood, his sweetheart, Maid Marion and that good-for-nothing scurvy Prince John.
.

                   I mentioned when we were watching the movie that maybe their dad and I could dress up as Maid Marion and Robin Hood for Halloween sometime, and Fern latched onto that idea right away. Except that she knew she wanted to be Maid Marion, and therefore her sister would have to be Robin Hood. This was all well and good when her sister had just turned two and didn't have too many opinions on things. As the year went on however, she began realizing the power of choice and has since refused to do just about anything unless it is her idea. So she went through her routine of thoroughly rejecting this idea, then coming up with it on her own soon after. And by the beginning of September they were both gung ho about these characters and I could begin trying to fit sewing into the free time that existed among 3 weddings and a week long family vacation out of the country that took place between labor day and Halloween.
             
Wow, they are cute. 
I will do another post with more complete info about the construction process, but I will give an overview here. Fern's costume consists of two dresses, a hat with a veil, a necklace and a removable fox tail. Althea has a dress, hat, pants, mittens and a belt with a fox tail attached. 
I decided to do two dresses for Fern instead of a dress with a blouse underneath because a) Maid Marian has many layers of skirts visible underneath that dress when she dances in the forest
b) I didn't have a pink knit that would have been good for making a turtleneck and 
c) I did have a pink tablecloth that I came across in a free box while walking to pick up our farm share one day that has this awesome eyelet trim around the edge that was just too good to not use as the bottom edge of a dress. And it was the perfect light pink color. 
So she has this pink wrap dress:

underneath the purple one for extra layers of skirt!
The purple dress is made from a bed sheet that she actually was currently using on her bed. She has two back ups though, and I couldn't help it. It was the perfect color and so soft. It is pretty thin though, so it is lined with an old bed skirt which has a ruffly edge to it. 
The hat was made with interfacing that I had on hand from their Easter Bonnets, covered in the purple sheet. The veil was (I love this) a layer taken from a carefully disassembled bridesmaid dress that I wore in my brother's wedding last year. It has some really lovely drape to it.


Did you notice? She has a fox tail. She LOVES that thing. 
She also has a necklace made from a lovely pendant that is a broken pin that belonged to my great grandmother. I didn't want to sew it onto the dress, or to make a choker for her, so we made a necklace with a matching purple ribbon and brought that blue from the Disney character's dress into our ensemble. 
(she is wearing a turtleneck sweater under the dress in this picture as well to keep her warm for the parade)

Althea's dress is made from an old shirt of mine. My only fabric purchases were the yellow felt for her hat (which followed this tutorial), and the orange fleece for her pants and mittens. I got away with purchasing about a 1/3 yard of the felt, and 1/2 yard of the fleece. Both of which were already on sale and so totaled about $4. I had the red feather on hand already and we re-used an old belt. She had a perfect pair of faux fur / suede boots on hand already as well. And ta-da! There you have it. 

Here's a peak of her tail:

And finally, on the big day, I painted their faces to look more like the fox characters:


I hope everyone had a Happy Halloween!


You can see some other awesome Halloween costumes linked up along with these guys 


Friday, August 22, 2014

Go-to dress for a multitude of bridal events


Back in May I made myself my third Laurel dress (a Colette Pattern). I just love this pattern. It is such a great simple shift dress. There are darts in the back and at the bust to give it shape, but it is very boxy across the belly which is just what I need in a dress. The simplicity allows the dress to be worn casual or easily dressed up with the right accessories. A true shape shifter (too much, sorry). 
The first Laurel that I made was in a linen from JoAnn's in a shade called "tobacco." 
I really liked it and learned a lot while sewing it. 
I learned even more after I finished sewing it. 
Such as it is really truly important to make sure to wash your fabric before you sew with it. 
Especially if it is a woven fabric and you are making a garment. 
Because it will shrink, and you will have spent a lot of time making something that perfectly matches your own style for one of your smaller sized friends or family members.
Alas, I can still put the original one on and zip it, but it is too tight across the shoulders and I can barely lift my arms. Not really wearable. 
So.....I moved on.

I like this one too. 
The exposed zip is a fun trendy detail. (The pattern calls for an invisible zip, so this was a modification.) I decided to use this zipper while shopping for zips for Fern's coat. It is actually a separating zipper but I figured who cares, the color matches the fabric so well I had to use it anyway. 
The fabric is a great rayon type fabric that was on clearance at JoAnn's. It is very see through and light weight, so it is lined with an old bed sheet everywhere except the sleeves. The lining actually falls a couple inches shorter than the length of the dress as well. The old sheet is so soft against my skin, very comfortable. 
I ended up making a bit of a high-low hem. This dress is a lot shorter than my typical dress, and I spend a lot of time chasing around young kids, so the extra length in the back feels safe to me. I also like to have it there when I am sitting down, so that my legs aren't constantly sticking to the surface of whatever chair I am sitting on.
So there it is. 
It has already been to a wedding, a bridal shower and it is going to come out in the Hampton's for a posh bachelorette weekend this Saturday. (All of my bridesmaids plus another dear friend are getting married this year!)
It feels great to make something that I feel so comfortable in, using fabric / colors that I adore and to get some great use out of it!

So here it is in action! (how beautiful is Lake Tahoe? A-maze-ing)

....and the co-ordinating tie he already had (from our last California wedding actually), cha-ching!

Cheers!

Monday, August 18, 2014

Baby Clothes!!!
A friend of mine is having a baby, and I was so thrilled to have an excuse to use some of the little baby patterns in my Ottobre magazine. It is the 6/2013 issue
that I bought to make the girls' Easter coats. When I saw these patterns for the wrap onesie and big elastic-waist easy-going pants I started getting the baby bug myself, so it was a relief when I had a friend to sew for! 

She is having a little boy and lives in Colorado, so I upcycled an old T-shirt advertising a great CO ski resort to make one of the shirts, and used fabric from the same shirt for one of the pairs of pants. 

It was fun to play with the pattern pieces and the placement of the logos for the onesie. I happened to have just enough of a light blue thread that matched the decal to top stitch all of my seams (I actually put it in the bobbin and just used it to finish all of my seams instead of going back and topstitching as a separate step). 

The  fabric of the green striped top (and matching cuffs on the pants) is an old baby blanket. The white trim on this one was cut as bias strips from an old tshirt. I also used this old shirt to cut small rectangular scraps to make tags for all the pieces. They don't flap at all like tags (we don't want to be tickling that little baby neck), I guess it is more appropriate to call them labels. It's just a rectangle that is sewn into each item with the guess-tamite size written in with fabric marker. (Ottobre sizes their clothes in cm which is a little confusing, especially when you don't have the little model in front of you to measure. I used the smallest size of the pattern for one set and called it 0-3 m, then made a couple sizes up and called it 6-9m - it will be interesting to hear when these clothes actually fit her baby)


             These patterns just seemed so practical for a little baby. I love how the onesie doesn't go over the head at all; the baby can just be lain down inside the onesie and then it is wrapped around him and snapped.
           I had never installed snaps onto a garment before. The key elements seem to be making sure there are an adequate number of layers of fabric (intalling them on the binding worked fine; on places where I put them in on a single layer of fabric the instructions had me add an additional layer by ironing on a circle slightly larger than the snap with interfacing, this worked well) and having a spool to place over the snap while hammering it into place. I realized a little too late that I should be placing fabric between the snaps and other layers of the shirt while hammering away; some of the white coating of the snaps rubbed onto the fabric in little white circles you can see in some of these pictures. They are all on the interior of the shirt though, and I'm sure they will wash out easily.
            The pants look so comfortable and easy to put on as well. Nice and baggy and loose to hopefully cover a cloth diaper with no trouble. I was happy to add the tags to the pants as well because although there is a distinct front and back side to them, it can be difficult to tell which is which when looking at them quickly. There is a navy pair of three-quarter length pants (good for a summer baby) made from an old tshirt and utilizing the existing hem as the cuff hem. The other pair are made from the same fabric as the shirts as mentioned, and have a great stretchy cuff on the bottom that add to the cuteness factor and have a lot of potential for creating a fun little layette of baby clothes.


            I have enjoyed sewing without patterns quite a bit in the past, but I don't think I would have even attempted this project with one. No one wants to fight with a little newborn babe trying to put on wonky sized clothes. Hopefully they will fit the little guy like a cute and comfy broken in cotton glove!