Wednesday, May 25, 2016

Baby gifts galore- part 1

I love it when my friends have babies. 
It's so sweet and exciting. 
I loved having babies, so I love to see folks close to me going through that same exhilarating and magical experience. 
And.....I get to sew things for babies. 

I have two close friends that are becoming mothers for the first time this spring. And, shame on me, I took zero pictures of the things I made for one of them. But I did very similar things for both, so I will share what I have. 
Both ladies are going to be using cloth diapers. Which is awesome. Seeing as how most folks don't go there, however, most of the rtw baby clothes out there do not fit over those adorable hugely padded little bums. 
So that is where home made clothes and Rae's Big Butt Baby Pants pattern comes into play. 
This is the first time I used it, and it is a great pattern. Everything lines up so well and comes together so nicely. I am starting to use patterns for almost everything I sew, because it is SO worth it. I used to scoff at the idea of spending $ on a pattern instead of tracing clothes they have or winging it, but I am changing my tune. Especially if I am spending $ on fabric, which I do a little more often now. I still love to upcycle, but I just can't help myself with the adorable prints out there sometimes; especially with special gifts. 
And if it is a great pattern, it ends up getting used so much that the price per use becomes almost negligible. And even if it is only used a few times, the cost often balances out the time it saves, and prevents wasting precious fabric.  So using patterns is one of my big resolutions for this year, and I am doing well with it. Of course, modification and pattern hacking are always available!
I have made 5 pair of the big butt pants. 
Here are 3 of them:
 They are not actually lopsided as this picture seems to depict; but I took pics right before popping them in the mail, so no chance for redos. 
 I added elastic to the leg openings on this pair. 
This 3-6 m pair was a spontaneous use of the scraps I had leftover from my other 4 pairs. One of the beautiful things about baby clothes- it doesn't take much yardage! I love the mix of fabrics here too.

They are all flannel. I bought the spaceships and dogs at JoAnn's and the stars are both old baby blankets.  Baby clothes really make me smile. I also loved hearing my girls asking "mom are those more big butt baby pants?" They loved the name of the pattern as much as I did. 
Rae also has examples of / tutorials for adding ruffles across the butt piece for little girl pants. 
Keep having babies please, my friends!


Monday, May 16, 2016

Now I'm (in) Free.....Free Motion

        Wow! The earth shifted under my feet yesterday. I was like Dorothy stepping into Oz and my surroundings went from black and white to color. It was like the moment at a wedding when your favorite song comes on, your impossibly high heels come off and you can finally REALLY bust a move.
        I covered those feed dogs up with a darning plate, and just like that......free motion quilting!
Darning plate
        What took me so long to do this?! I guess I thought that I needed to screw the darning plate on, and that I would have to go locate some tiny little screws and a doll sized screwdriver. But not even - this magnificent little piece of plastic has little pegs attached to it that sit perfectly into the holes provided and it aligns itself in seconds. And stays put when I sew!

Here is my machine with and without the darning plate. The most time consuming part was threading my bobbin thread through the hole before I installed the plate. 

I also changed my presser foot, but I believe the darning plate made most of the difference. I bought a kit of extra feet a few months ago, and it came with a darning foot. This installation did require the removal and replacement of a screw, but a normal screwdriver sufficed.
 Here's a side view of the darning foot, installed. 
This is what I took off to put the darning foot on; my "low shank adapter" fitted with a zig zag foot

        I have a Babylock BL9. It's a great machine. It always amazes me how many things are possible with a basic sewing machine. I got this one when my old Singer died. I brought it to be fixed, but they let me know there was nothing to be done (fixing it would have cost more than replacing it) and so this one came home with me. I wasn't planning on buying a new machine that day; hadn't been saving for it at all, so I brought home the most basic machine they had that still had at least a zigzag stitch. It did come with some extra feet, this darning plate, and some stretch stitches that my other machine didn't offer, so it ended up being an upgrade while remaining closer to $100 than $200. The instruction books never really give you the full idea of what is possible though, so I love this internet community that helps me discover all the possibilities available to me in my sewing.
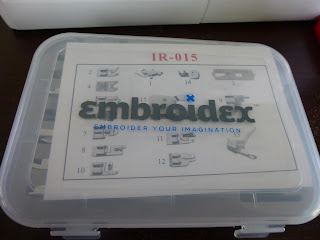
Embroidex kit of extra presser feet; it includes fifteen pieces and came with this case and a sheet identifying all the feet with a brief description of what each was for. 

       I bought that kit of feet when I was sewing the rainbow/ school quilt. Several of the feet included I had already (button foot; buttonhole foot; zig zag; zipper). I was looking for a walking foot at the time though, because I thought it would solve all my quilting problems. I was having issues with having the top and bottom layers end up in slightly different places and ending up with some bunching. The walking foot's job is to pull the top layer of fabric along the way the feed dogs pull the bottom layer along, so that everything stays even. Unfortunately, I began the quilting of that project by sewing around the outside of the quilt, and I think that created problems beyond the scope of changing my presser foot.
        I used the walking foot for another small quilting project, and honestly, I don't really notice a difference between using that and my normal presser foot. Perhaps it is not a high enough quality foot? I do feel confident I installed it properly. Anyways, using the darning plate (which covers the feed dogs so that the movement of the fabric is controlled completely by me, and can go in any direction without twisting the entire quilt around) and the darning foot (which lifts up when the needle is up so that it doesn't hinder the movement of the fabric between stitches) completely solves my problems. Also, I have learned to start in the center of the quilt, and to radiate out from there, trying not to leave big gaps to come fill in later. Perhaps this is the biggest factor in reducing the bunching on the back of my quilts.
        The darning plate also allows so many more possibilities in terms of design. Being able to turn at the drop of a dime, in any direction, is truly exciting. A whole new world my friends, and I didn't need to purchase a whole new (expensive) machine to get there.
     
        When I was in college, there were some guys that lived next door to my good friends, and they had a little band. A house party type of band, pretty casual; I don't remember the band's name or the names of any of the guys in the band (maybe one was Warren?), but I do remember the chorus from a song they had. The lines are called out in a monotone but last part of the second line is repeated in a deep baritone (written in italics here); it's all accompanied by a steady, funky guitar: "As I lay me down to sleep, I pray the lord my mind to free!/ Free your mind, your ass will follow/ your ass will fol-low"
         I need to have some sort of soundtrack playing externally or internally the whole time my machine is whirring, and this song seems to be it for the past couple days. I'm not sure I've landed on the winning combo of words to fit my situation yet, but I think it may be: "Free your feed, your lines will follow!"
       I applied this song to my skiing as well, when I finally found a pair of reasonably priced tele boots and could free my heel. Free your heel, your knee will follow! Or maybe ass works just as well here. The words change pretty often, but the head bobbing stays about the same.

Thanks for stopping by!

Thursday, May 5, 2016

Quilting for Fun and Fundraising

      This February, a fellow parent from my daughter's school asked me if I had any ideas of things the kids could make to sell for silent auction at an annual fundraising event being held in early April. Seeing as sewing is so often on my brain, I suggested making a quilt that the kids help create. She loved the idea (especially since I volunteered to sew it!) and so I spent a good chunk of the month of March madly cutting and sewing and quilting. It was a hit and they ended up using it as the only item up for live auction that night. 
      It was a lot of work but good fun too. The school names the classrooms each a different color of the rainbow, and they recently voted their school mascot to be a cow. So the design of the quilt presented itself to me pretty easily. I cut out squares of muslin and gave the kids some fabric markers with free rein to decorate the squares however they liked. I provided some stencils and some ideas in case they needed some inspiration, but barely anyone paid any attention to that - they were so full of their own ideas. Then I arranged the squares in groups based on class, two rows for each class. The white squares were bordered by solid colored fabric in the color of their class. There was also a strip of the solid colored fabric above and below the rows. Then the classes were all sewn together in rainbow order. The Purples didn't participate (their students are older and they don't have as much free time in class) so I used purple to make a border so they would still be represented. Finally, I used a black spots on white cow print fabric for the backing, and made quilt binding out of the cow as well. I used the same tutorial for the binding as I did on my first quilt, because it is so clear and easy to follow with great results. 
    The top row of blue squares and the two rows of indigos are not in this picture, but this is the best shot I was able to get of it. It is a double sized quilt; about 80x88". And believe it or not, I did iron all parts of this several times. The light in this picture is really highlighting all the wrinkles created during my quilting battle. 
     I kept the quilting super simple, because I do not have a long arm machine, and this is the second quilt I have ever made! It is mostly stitch in the ditch, with a row of zig zags on the solid stripe in the middle of each class section. I learned my lesson about starting my quilting in the middle of the quilt instead of zipping a line around the border of the quilt first thing. Yikes, not sure what I was thinking. I was able to smooth things out pretty well though, and really the focus of this quilt is the kids art not my sewing. 
      I brought the quilt in to show all of the kids during a school wide talent show that was held the week before the fundraising event (the fundraiser was adult only, so I wanted to give the kids a chance to see it). It was so great to hear all of their voices exclaiming when I unrolled it and held it up! They were so excited to see their work compiled into a big functional object. "Wow!" "I see mine!" "Beautiful!" That was definitely my favorite moment. Fern came up to the front of the room to help me hold it up and display it for everyone to see. She was very proud as well, which was very sweet. She usually says she never wants to be in the talent show, and is scared to get up in front of the whole school (understandably! that type of stuff used to terrify me as well!), but she said that she was looking forward to going up there with me all day. Aw. 
      Getting the quilt squares back was like Christmas. I loved seeing what each child came up with. It was great to see themes emerge from each class (the green have a lot of bird watchers, the reds love basketball, lots of pacman fans in the oranges, etc.) and to see the differences between the age groups (ranging from K-5). Here are some of my favorites. 
Note the sloth in the red section!
 
   There were so many awesome images. My only regret is that I didn't take more pictures. I was too concerned with trying to keep the dog hair off everything. No small task when you are dealing with this much fabric!
   I had so many ideas for this that didn't end up making it into the quilt for the sake of time and simplicity. Perhaps there will be more in the years to come....

Thanks for stopping by!